- where does ai generated code live
- how to host ai generated code
- embed ai generated code
- deploy chatgpt or claude code
- vibe coding deployment
cta_primary_url: https://fugte.app/ cta_secondary_url: /vibe-coding author: WebDYI ---
AI Can Generate Code — But Where Does It Live?
You asked an AI to build you a calculator. It returned a clean block of HTML, CSS, and JavaScript, the preview looked perfect, and you copied the code feeling accomplished. Then you paused. Now what? Do you paste it into a document? Email it? Drop it into your website builder and watch nothing happen? That pause — the gap between generating code and getting it live — is where millions of non-technical builders get stuck every day.
The barrier to creating code has collapsed. Claude, ChatGPT, Gemini, and Cursor can produce working forms, calculators, and widgets from a sentence. But the barrier to publishing that code — getting it onto a real URL, embedded in the tools you already use, in front of actual visitors — is still surprisingly high. This post explains why, walks the usual path, and shows how WebDYI turns the whole thing into a single paste.
The Hidden Gap: From "Generated" to "Live"
When Andrej Karpathy coined "vibe coding" in early 2025, he described a workflow where you describe what you want, the AI writes it, and you iterate by conversation instead of syntax. A year on, it's a real way to build. But the open secret of vibe coding is that the hard part isn't the generation — it's everything after the AI stops typing.
The problem is structural. AI tools are optimized for creation, not delivery. They produce code inside chat windows, artifact panels, and cloud editors. Turning that into a public page — or an interactive widget inside your existing site — requires knowing about file formats, hosting, domains, and embedding. Most tutorials skip those steps in a single sentence, which is exactly where the workflow falls apart.
The Copy-Paste Trap
The most common failure looks like this: you copy AI-generated HTML and paste it into
a rich-text editor, a social post, or your site's visual builder — and nothing
happens. Or worse, raw <div> and <script> tags
show up as plain text and the page looks broken. That's because most platforms are
built for content, not code. They escape or strip HTML for safety, so your calculator
becomes a wall of visible markup.
The fix starts with one idea: code and content are different things. Code has to be saved in the right format, hosted on a server, and then displayed as a page or embedded through a special element. The usual path has four stages — Generate, Save, Host, Embed — and each one has its own tools and its own ways to trip you up.
The Usual Path: Four Tools for One Snippet
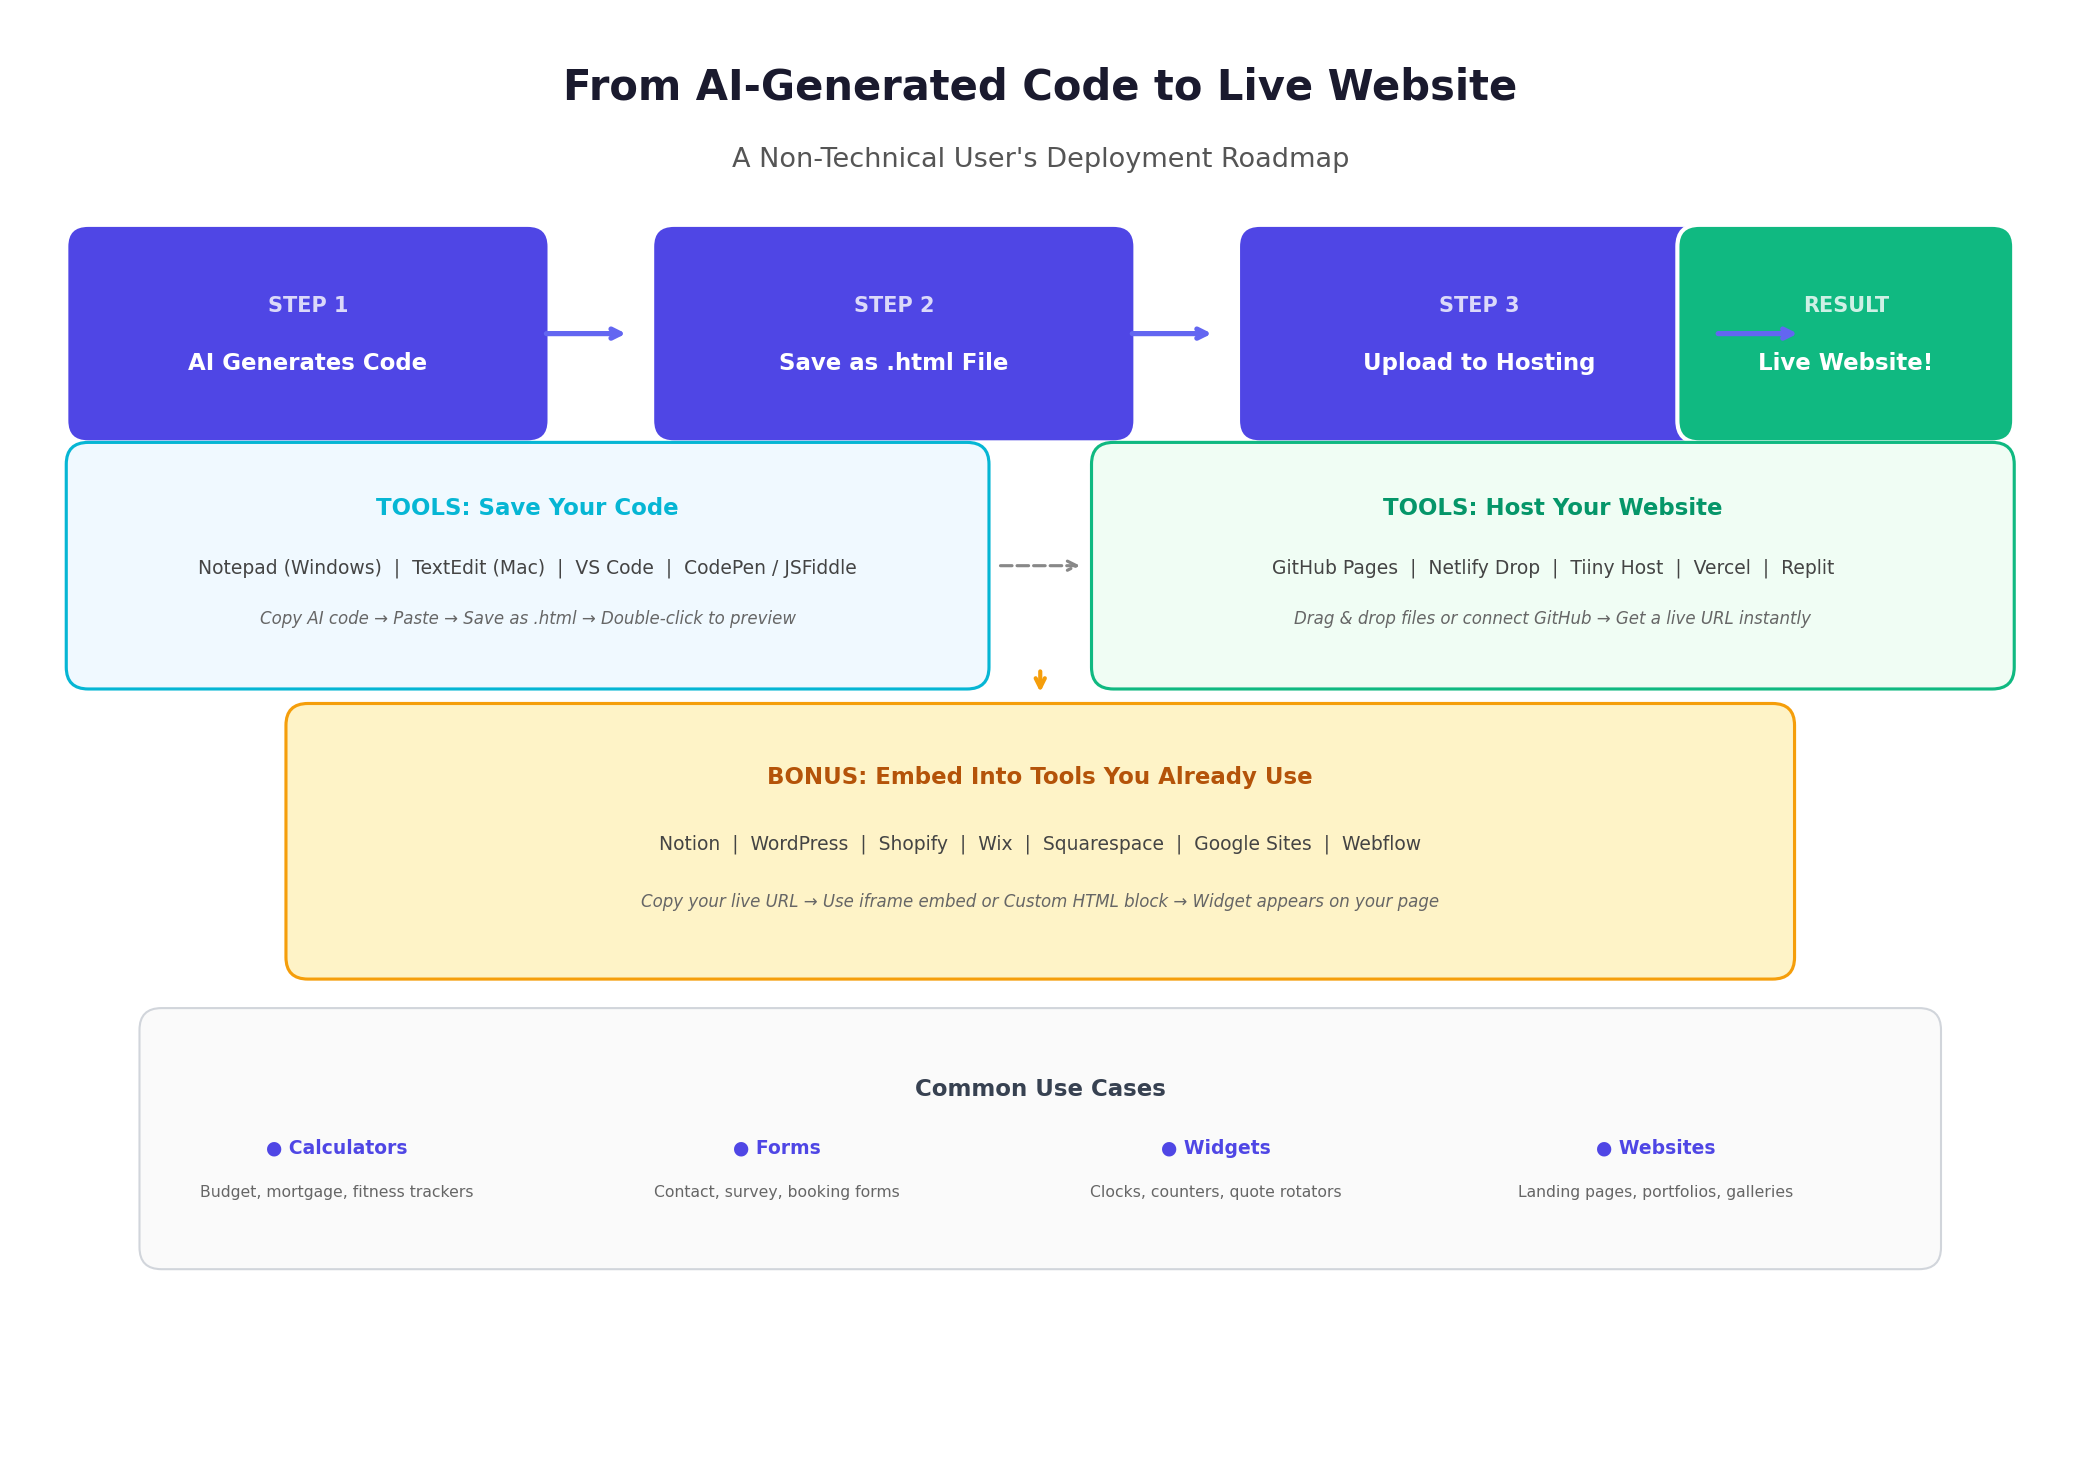
Stage 1 — Save it as a file
Before code can go anywhere it has to become a file. You open a plain-text editor —
Notepad on Windows, or TextEdit in plain-text mode on Mac — paste the code, and save
it with a .html extension, like calculator.html. The
extension is the part people miss: without it, your computer won't treat the file
as a web page. Double-click it and it opens in your browser so you can test before
publishing.
Stage 2 — Put it on a host
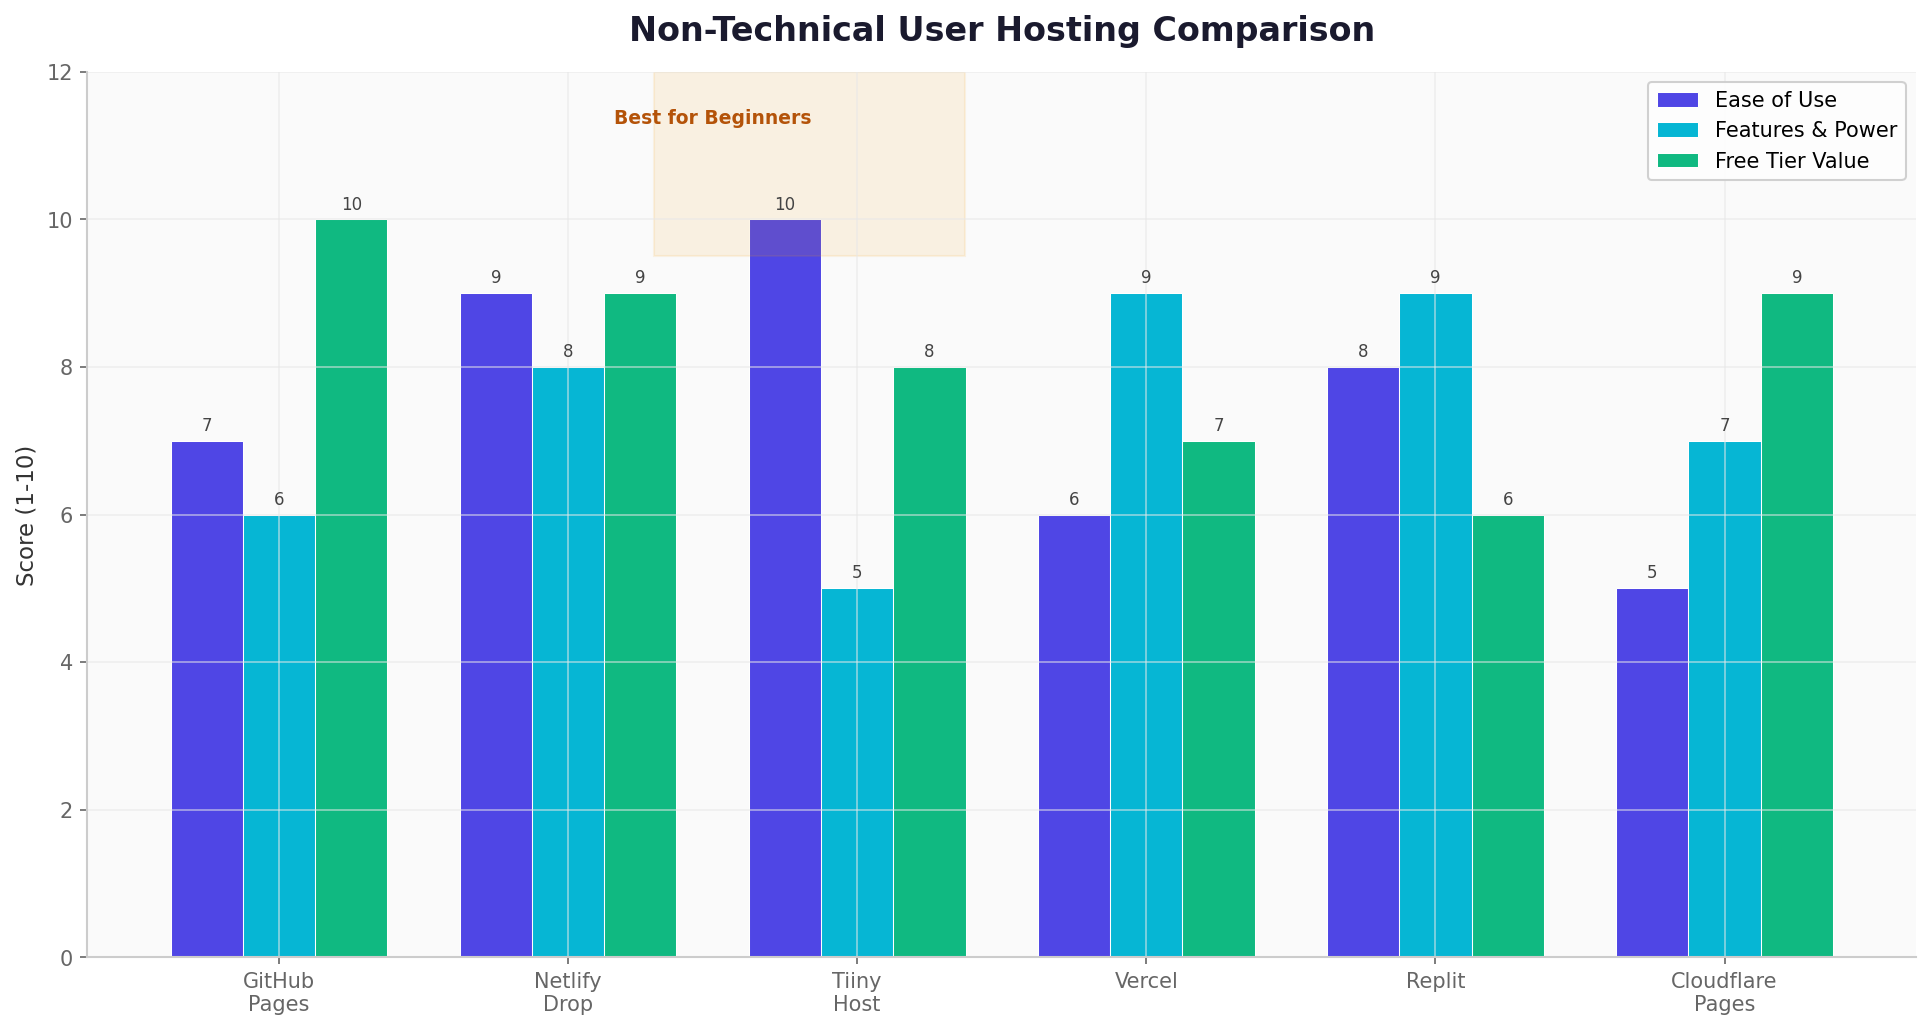
A file on your computer is only visible to you. To share it you upload it to a web host. Drag-and-drop services like Tiiny Host or Netlify Drop give you a public URL in under a minute; GitHub Pages is free forever but asks you to learn repositories first. Each has trade-offs around custom domains, form handling, and how long a free site sticks around.
Stage 3 — Embed it where you work
A standalone URL is rarely the goal. You want the tool inside your existing site, your Notion page, your Shopify store, or your WordPress blog. The standard technique is an iframe — an HTML element that shows content from another URL inside your page. You paste a snippet like this and tweak the size:
<iframe src="https://your-tool-url.com" width="100%" height="400"></iframe>
Notion has a /embed block, WordPress has a Custom HTML block, and Wix,
Squarespace, and Webflow each have an embed element. The pattern is always the same:
host the tool at its own URL, then point an iframe at it.
Where this path breaks down
Done carefully, that flow works. But look at what it asks of a non-technical builder: save a file with the right extension, pick a host, create an account, upload, copy a URL, write iframe HTML, guess a height, and repeat the whole loop every time the AI changes something. And you still don't have the two things that matter most for real use:
- A way to change the text, colors, or images later without re-prompting the AI or re-uploading files.
- A safe boundary so a stranger's generated JavaScript can't break — or read data from — the page you embedded it on.
That gap is exactly what WebDYI was built to close.
The Shortcut: One Paste Instead of Four Tools
WebDYI collapses Save, Host, and Embed into a single step, and adds the customizer and safety layer the DIY path leaves out. You paste your AI-generated HTML, CSS, and JavaScript into the editor, and you immediately get:
- A hosted URL on a fast CDN — no file to save, no separate host to sign up for.
- A no-code customizer, generated from a small schema, so you or a client can edit text, colors, and images through a simple form instead of touching code.
- An embed you can drop into Canva, Shopify, WordPress, Notion, Webflow, or any site — as an auto-resizing iframe or an inline snippet.
- A sandboxed, opaque-origin frame — the same isolation model major platforms use — so the widget can't touch or read the host page.
- Real data when you need it: forms can persist submissions, with spam protection and rate-limiting built in.
In other words, the same four-stage journey — generate, save, host, embed — becomes: paste, expose a few settings, copy the link.
How it works, start to finish
- Paste your code. Start from a tested starter widget or drop in exactly what the AI gave you. The live preview renders as you go.
- Mark what's editable. Add a tiny schema describing which fields — a heading, a color, an image — should be changeable. WebDYI turns it into a no-code form automatically, and you can ask the AI to write that schema for you in the same prompt.
- Get your link. Click Embed and copy the hosted URL or the inline snippet.
- Put it anywhere. Paste it into your site, a CMS, or Canva's Embed element. It stays live, and edits in the customizer show up everywhere it's embedded.
DIY or WebDYI: Which Should You Use?
Be honest about the job. If you just need a throwaway page to share once, dragging an HTML file onto Tiiny Host or Netlify Drop is genuinely fast and fine. If you're building something you'll reuse, embed in more than one place, hand to a client, or change over time, the file-and-iframe path starts to cost you: a new upload for every edit, no customizer, and raw third-party JavaScript running directly on your page.
WebDYI is the better fit when you want the result to be reusable, editable by a non-coder, and safe to embed — without becoming the person who re-deploys a widget every time someone wants a different color.
Quick Scenarios
You built a calculator
Mortgage, ROI, pricing, fitness — calculators are the most common AI build. Paste it into WebDYI, expose the inputs you want editable (rates, labels, currency), and embed the link on your pricing page or in Notion. Change a default later from the customizer instead of editing code.
You built a form
Contact, survey, or booking forms usually need to send data somewhere. Instead of wiring up a separate form service, let WebDYI persist submissions for you — with Turnstile and rate-limiting on by default — and read them from your dashboard.
You built a widget
Countdown timers, before/after sliders, hover reveals, and quote rotators are made to be embedded, not visited. Host it in WebDYI and drop the auto-resizing embed wherever it belongs — it sizes itself to its content instead of you guessing an iframe height.